How to Layer Bathroom Lighting Like a Designer
“My bathroom looks great in the day, but at night it’s either too dim—or too bright and harsh.”
Sound familiar?
Many homeowners struggle with poor bathroom lighting: dim mirrors, uneven shadows, or overexposed vanity areas that make the room feel clinical. One overhead bulb simply doesn’t cut it anymore.
The solution?Layered lighting—a professional design approach that combines multiple light sources to make your bathroom functional, flattering, and comfortable at all times.
AtPinShop, we help you achieve this look without a full renovation or fancy wiring. Let’s break it down.
Step 1: Understand the Three Light Layers (and Why They Matter)
According to theAmerican Lighting Association (ALA), a well-lit bathroom uses at least two layers of lighting, and three is ideal.
1.Ambient Lighting– the base layer
Fills the room with general light. Think ceiling-mounted lights or
-
Common pain point:“The whole room feels gloomy.”
-
Solution: A soft-glow flush mount fixture or 3-4 recessed ceiling LEDs, evenly spaced.
Designer Tip: Use2700K–3000K warm white bulbsto avoid a cold, clinical feel.
2.Task Lighting– lighting that works where you do
Focused light for grooming, makeup, shaving, or skincare. Most useful near mirrors.
-
Common pain point:“I can’t see both sides of my face clearly.”
-
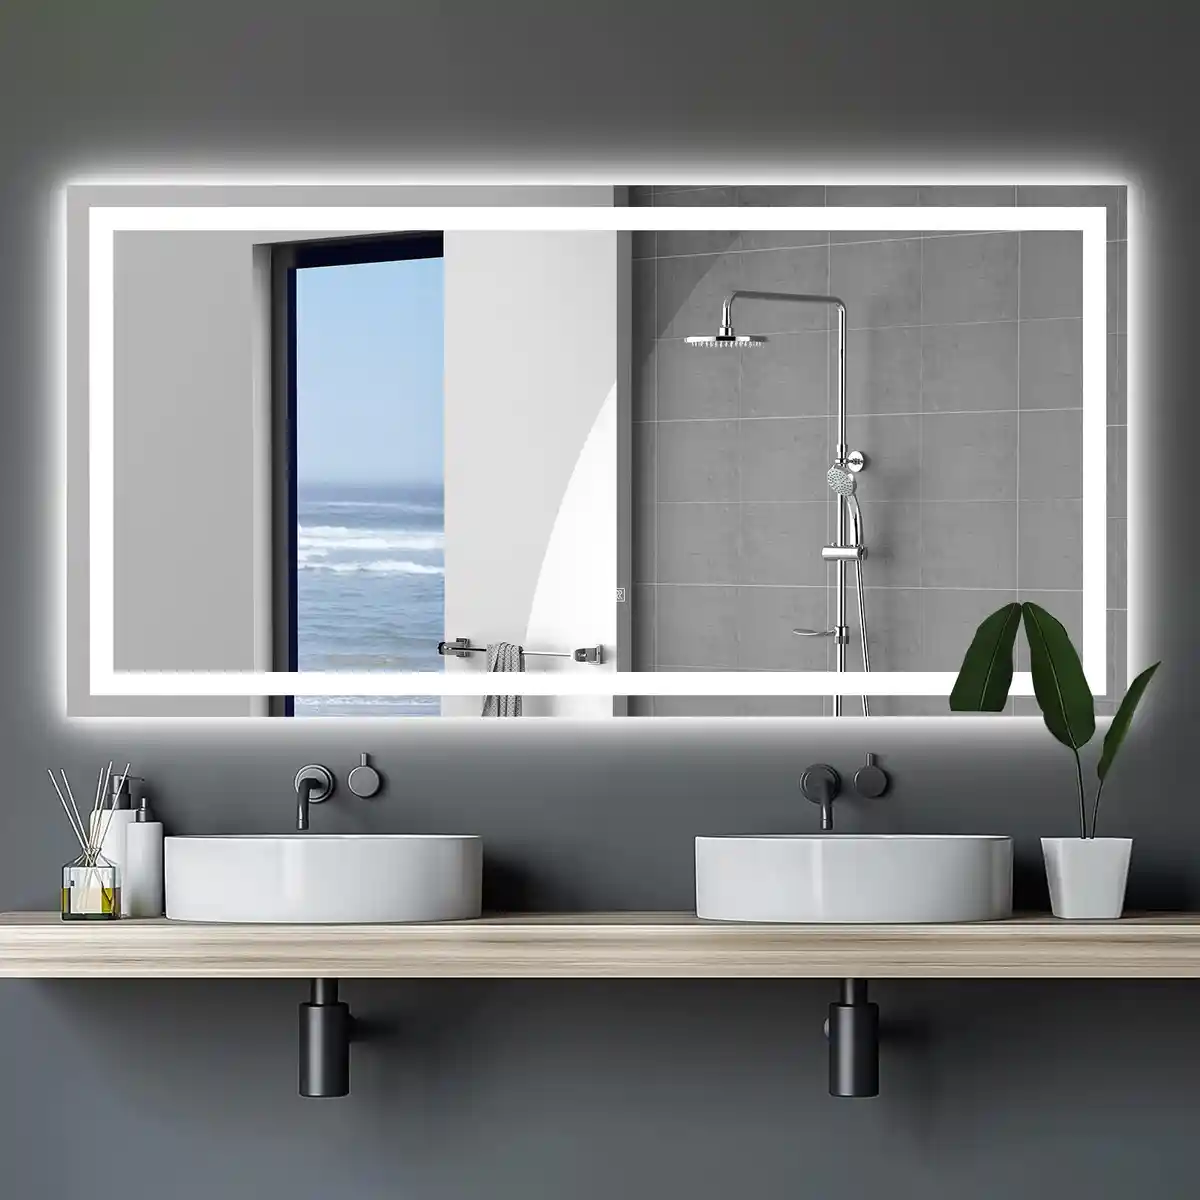
Solution: Usevertical sconces on both sides of the mirror, mounted ~65–70 inches from the floor.
Studies by Houzz show over 60% of homeowners regret choosing only overhead lighting for vanity areas due to poor visibility.
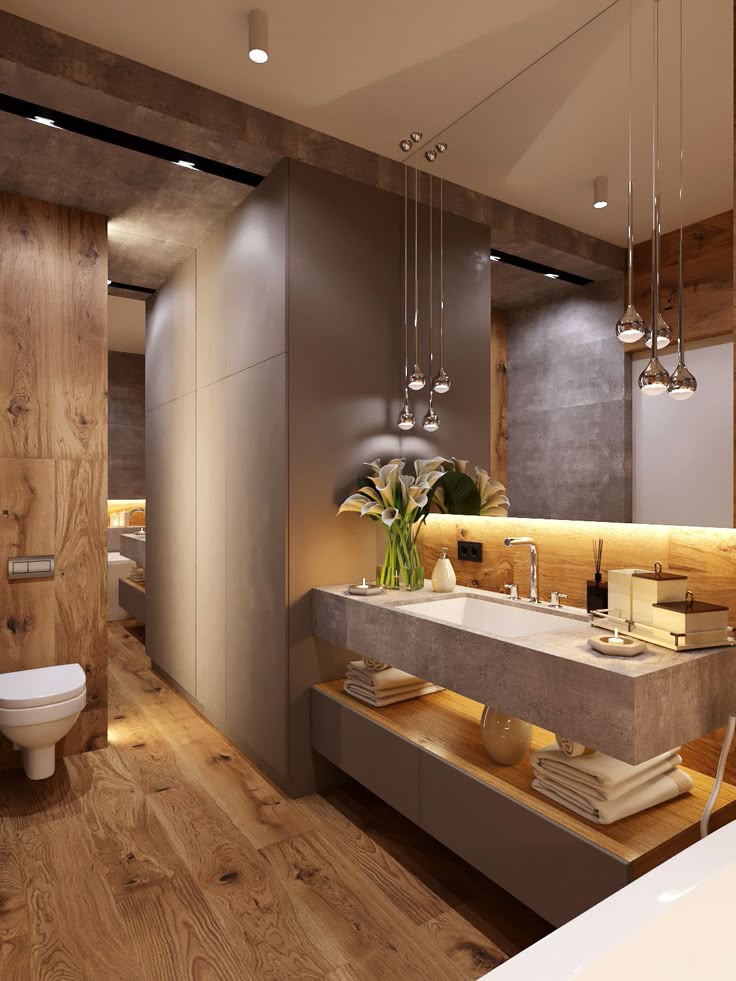
3.Accent Lighting– adds visual depth and warmth
Adds style and enhances design details (like alcoves, artwork, or under-vanity glow).
-
Common pain point:“My bathroom feels flat and boring.”
-
Solution: TryLED strips under shelves, toe-kicks, or behind mirrorsfor spa-like ambiance.
Step 2: Choose the Right Bulbs for Each Layer
According toLighting Research Center (LRC)guidelines:
| Layer | Brightness (Lumens) | Color Temp (Kelvin) | Dimming Recommended? |
|---|---|---|---|
| Ambient | 2000–3000 | 2700K–3000K | Yes |
| Task | 800–1200 (per side) | 3500K–4000K | Optional |
| Accent | 100–300 | 2700K (warm) | Yes |
Real World Tip: Don’t mix warm and cool tones in the same room. Keep all lights in the2700–3000Krange for visual harmony.
Step 3: Design Based on Real-Life Scenarios
Good lighting isn’t just about looks—it’s about solving everyday frustrations.
Here’s how to apply layered lighting to real-life situations you actually deal with in your bathroom:
Morning Chaos: “I’m running late and my face looks two-toned in the mirror.”
If you rely on just an overhead light, you’re probably getting harsh shadows under your eyes or on one side of your face.
What works:
Install a pair ofvertical vanity sconces on either side of the mirrorat eye level. This evens out shadows and lets you see your skin tone clearly—especially helpful when shaving or doing makeup in a rush.
Real tip: Choose a neutral white bulb (around 3500K) for accurate color reflection.
Night Wind-Down: “The light is too bright when I just want to brush my teeth and relax.”
You’ve had a long day. Blasting full overhead light feels like a wake-up call when all you want is peace.
What works:
Usedimmable ambient ceiling lightsor turn onunder-vanity LED stripsfor a soft glow that’s easy on your eyes. This creates a calm, spa-like mood without making the room feel pitch black.
Bonus: Motion-activated accent lights work great for midnight trips without waking anyone.
Guest Ready: “My guest bathroom looks dull and flat—how do I make it feel more polished?”
Even a small powder room can feel thoughtful with the right lights.
What works:
Add astatement ceiling lightfor general brightness, asimple wall sconcefor function, and maybe abacklit mirrorto elevate the whole space.
Pro move: Stick with one metal finish and warm bulbs to tie everything together.
Step 4: Stay Safe – Use Moisture-Rated Fixtures
Bathrooms = humidity. Always look for fixtures labeled:
-
Damp rated(for general bathroom use)
-
Wet rated(for inside showers or above bathtubs)
-
IP44 or higher(European standards for moisture resistance)
Code Compliance: According toNEC 410.10(D), bathroom lighting must beinstalled outside shower zones or be wet-location rated.
Step 5: Make It Cohesive (Even If You Don’t Remodel)
You don’t need to rip out walls. Smart lighting updates = big change:
-
Upgrade a single vanity bar withtwo side sconces
-
Add adimmable LED ceiling lightfor warm ambient tone
-
PlaceLED tape lightingunder a floating vanity for subtle hotel-style glow
-
Keep finish colors consistent: max 2 metals (e.g., matte black + brushed nickel)
Layering Light = Instant Bathroom Upgrade
You don’t need to be a designer to think like one. With the right fixtures and placement,layered bathroom lighting transforms your space from functional to fabulous.
Whether you’re updating a rental, refreshing your primary bath, or just fixing poor lighting—PinShopoffers moisture-safe, easy-install lighting solutions you can trust.
Explore Bathroom Lighting Options
Contact Us for Lighting Advice